Drywall Finishing Butt Joints
Understanding Finishing Butt Joints
Drywall butt joints are the sections where the ends of two drywall panels meet. Unlike tapered joints, where the edges of the panels are cut at an angle, butt joints feature straight edges that create a more pronounced seam. This structural difference presents unique challenges during the finishing process, necessitating specific techniques for optimal results.
One key issue with butt joints is that they can be more noticeable after painting due to their abrupt transitions. This requires a more meticulous approach to taping and finishing to ensure a seamless appearance. The lack of a tapered edge in butt joints means that the area needs to be blended in a way that compensates for the increased visibility of the joint. Proper treatment of these joints is essential for a professional finish and to avoid unsightly markings on the wall.
Tools Required To Finish Butt Joints
To effectively work with drywall butt joints, it’s necessary to understand the tools and materials that will facilitate the process. Essential tools include a taping knife, a mud pan, drywall compound, and sandpaper for smoothing out the finished surface. Selecting the right type of drywall compound is also vital; a lightweight compound may be easier to work with, while a setting-type compound can provide added durability. Additionally, ensuring you have a clean workspace and appropriate safety gear will contribute to a successful repair process.
Overall, grasping the characteristics of drywall butt joints will provide you with the foundational knowledge needed for subsequent taping and finishing steps. This understanding is crucial for achieving a polished appearance and ensuring your drywall installation meets high standards of quality.
Preparing the Surface for Taping Butt Joints
Before proceeding with taping drywall butt joints, it is essential to ensure that the surface is adequately prepared. This preparation will significantly influence the final finish quality. Begin by cleaning the area thoroughly to remove dust, debris, and any other contaminants that may interfere with adhesion. Use a damp cloth or sponge to wipe the surface, and allow it to dry completely.
Next, inspect the drywall for any imperfections, such as uneven edges, dents, or holes. Any rough edges should be cut or smoothed using a utility knife or sandpaper. It is crucial to address these issues because they can affect the way the tape adheres to the drywall, leading to visible joint lines or cracking later on.
In addition to mechanical imperfections, check that the surface is dry. A damp surface can prevent proper adhesion of the tape and joint compound. If you have recently finished any plumbing or electrical work near the taped area, ensure that no moisture remains.
Choosing the right type of primer is also a critical step in the preparation process. Using a suitable primer helps seal the drywall surface and enhances the bond between the tape and the drywall. It is generally recommended to use a latex-based primer that is specifically designed for drywall applications. This type of primer not only helps in the adhesion process but also allows for better paint coverage once finishing is complete.
When it comes to selecting drywall tape, there are several options available, including paper, mesh, and fiberglass tape. Paper tape offers a smooth finish ideal for traditional taping, while mesh tape can provide additional strength and resistance to cracking. Each type has its advantages, so consider the specific requirements of your project when making a selection. Proper preparation will set the foundation for a successful taping process.
Applying the Tape To Butt Joints
Applying tape to drywall butt joints is an essential skill for achieving a smooth and professional finish. The process begins with the careful application of joint compound, commonly referred to as mud, over the butt joint. Start by using a taping knife to spread a thin layer of joint compound across the joint, ensuring that the surface is evenly covered. This layer should be approximately 1/8 inch thick to allow for proper adhesion without excessive buildup.
Once you apply the mud, the next step is to embed the tape into the joint compound. Choose either paper or fiberglass tape for this task; both options have their benefits. Paper tape is often preferred for its strength, while fiberglass tape is easier to handle for beginners. Lay the tape directly over the joint, pressing it gently into the mud with the taping knife. It is important to apply consistent pressure to avoid bubbles, which can lead to a flawed finish.
If air bubbles do form, use the corner of the taping knife to push them out gently. Start from the center of the bubble and work your way outward, smoothing the tape into the mud beneath. After ensuring the tape is fully embedded and no air pockets exist, apply a second layer of joint compound over the tape. Feather the edges of this layer by gradually decreasing the thickness towards the outer edges, which will help create a seamless transition between the joint and the surrounding drywall.
Proper tape application hinges on the correct amount of joint compound applied. Over or under-application can lead to uneven finishes, making it essential to master the balance. With careful attention during this phase, even those new to finishing drywall can achieve a professional-looking result.
Finishing Touches and Sanding
Once the tape applied to your drywall butt joints has completely dried, the next critical steps involve finishing and sanding to achieve a uniform surface. Begin this process by assessing the areas you have treated for any imperfections or raised edges that may disrupt the smoothness of your walls. A good practice is to run your hand over the joint to feel for bumps or uneven sections.
To start sanding, utilize a fine-grit sandpaper (around 120 to 150 grit) attached to a sanding block or a pole sander. Lightly sand the dried joint compound in a circular motion, being careful not to apply too much pressure, as this could remove too much material or damage the tape underneath. The goal is to create a flat surface that seamlessly transitions into the surrounding drywall.
After the first round of sanding, inspect your work closely once again. If you notice any dents, divots, or inconsistencies, you may need to apply an additional layer of joint compound. Allow this additional coat to dry thoroughly, and repeat the sanding process until you achieve the desired smoothness. Often, this method may require two or three coats of compound, especially in areas subjected to heavy usage.
Upon achieving a flawless finish, it is time to prepare for painting. Lightly sand the final coat with a very fine sandpaper (around 220 grit) to eliminate any dust particles and enhance paint adhesion. Before painting, ensure you properly clean the area to remove any dust left from sanding, and consider applying a primer to encourage a uniform color. This attention to detail in the finishing touches will ensure that your repair blends effortlessly with the existing drywall, creating a professional-quality finish.
FAQ
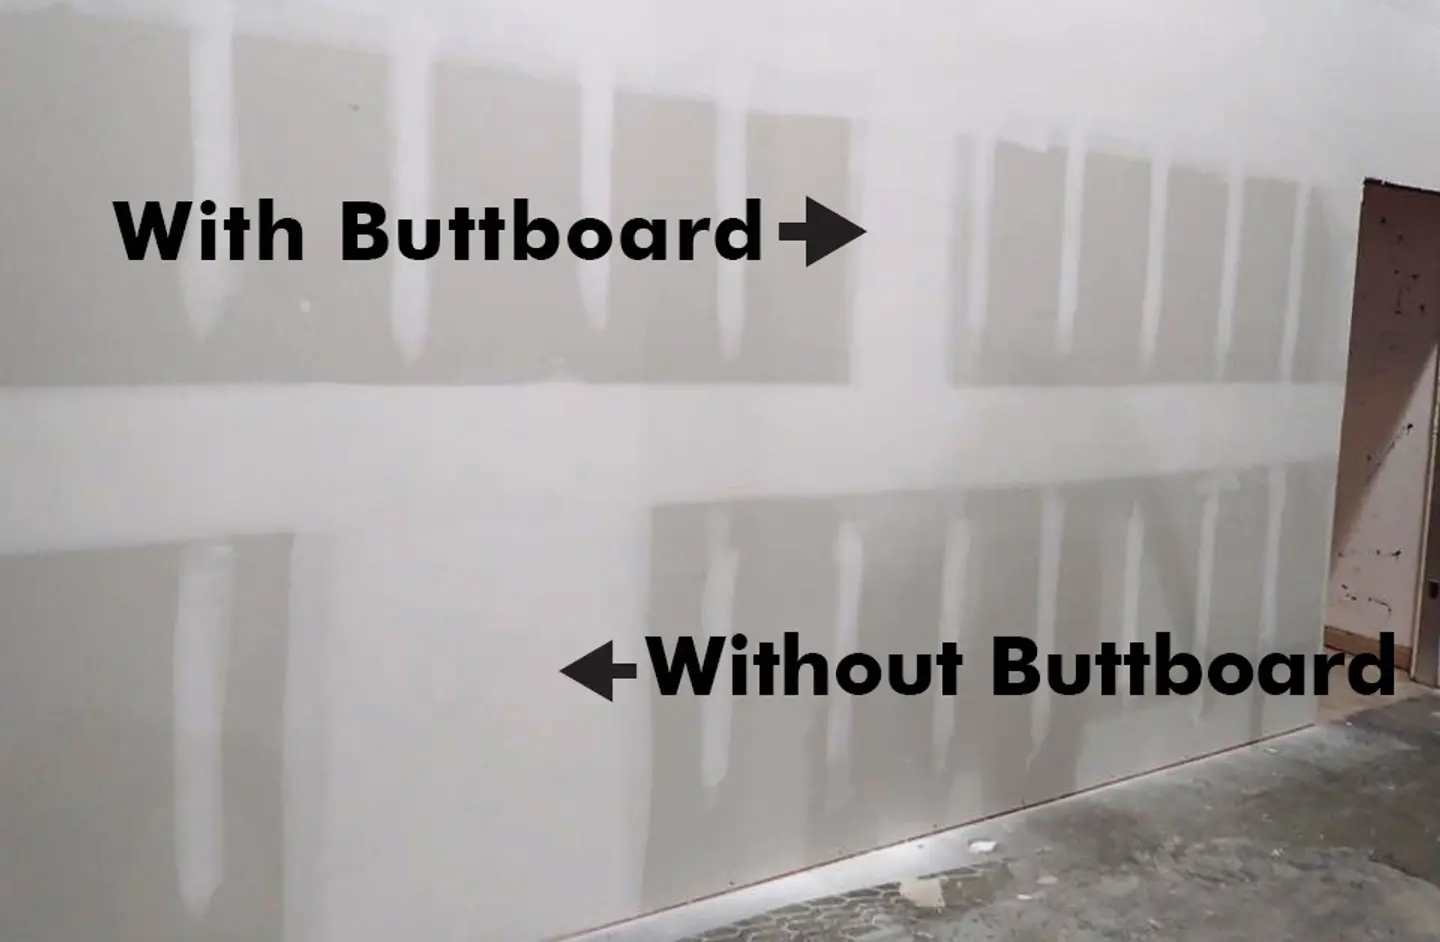
Whats the easiest way to finish butt joints?
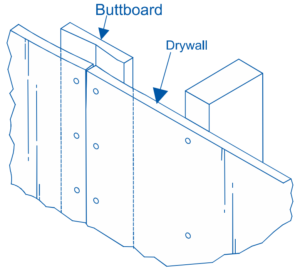
Use trim tex buttboard they are about $6.00 each. They create a recess for easy finishing.
Where can I buy Butt boards?
I get them from the drywall supply house. You can find them online sold in 10 packs for around $60 plus shipping.
Search for Trim-tex buttboard.
Why are butt joints so hard to finish right?
There is no recess so the tape creates a bump that must be feathered out wide.
Whats the best way to finish a butt joint?
Focus on building up the compound on each side of the tape at least 10-12 inches. Then apply a thin flat coat over the tape.
Time needed: 3 days
How to finish butt joints without special boards.
- Tape the joint with paper tape.
Apply a thin layer of compound over the joint. Apply tape and wipe excess compound out.
- Fill The Sides
build up compound 10-12″ on each side of the tape.
- Repeat step 2
Repeat step 2 until the tape is even with the compound on the sides.
- The center
With a 10 or 12 inch knife apply a thin coat over the tape down the center.
- Sand
Sand the compound smooth and feather the edges with a sanding sponge.
- Prime
Wipe off any dust and then prime and paint.
Check Out More Articles
Knockdown Texture Application Step By Step
Outside Corner Finishing Corner Bead
Finishing Recessed Drywall Seams
Trim-Tex Website Article : What are buttboards and how to use them